Installing an Explorer
runZero needs at least one Explorer in your environment for active and passive network discovery. Install it on a system with reliable connectivity to the network you want to discover. For internal networks, runZero works best on a system with a wired connection rather than wireless.
For external network discovery, nearly any cloud provider with a reliable connection should do. If the Explorer runs in a container or virtualized system, give it direct access to the network (host networking in Docker, bridged networking in VMware, and so on). SaaS customers with a Platform license can use the runZero hosted Explorers at no additional cost.
View an interactive version of this diagram
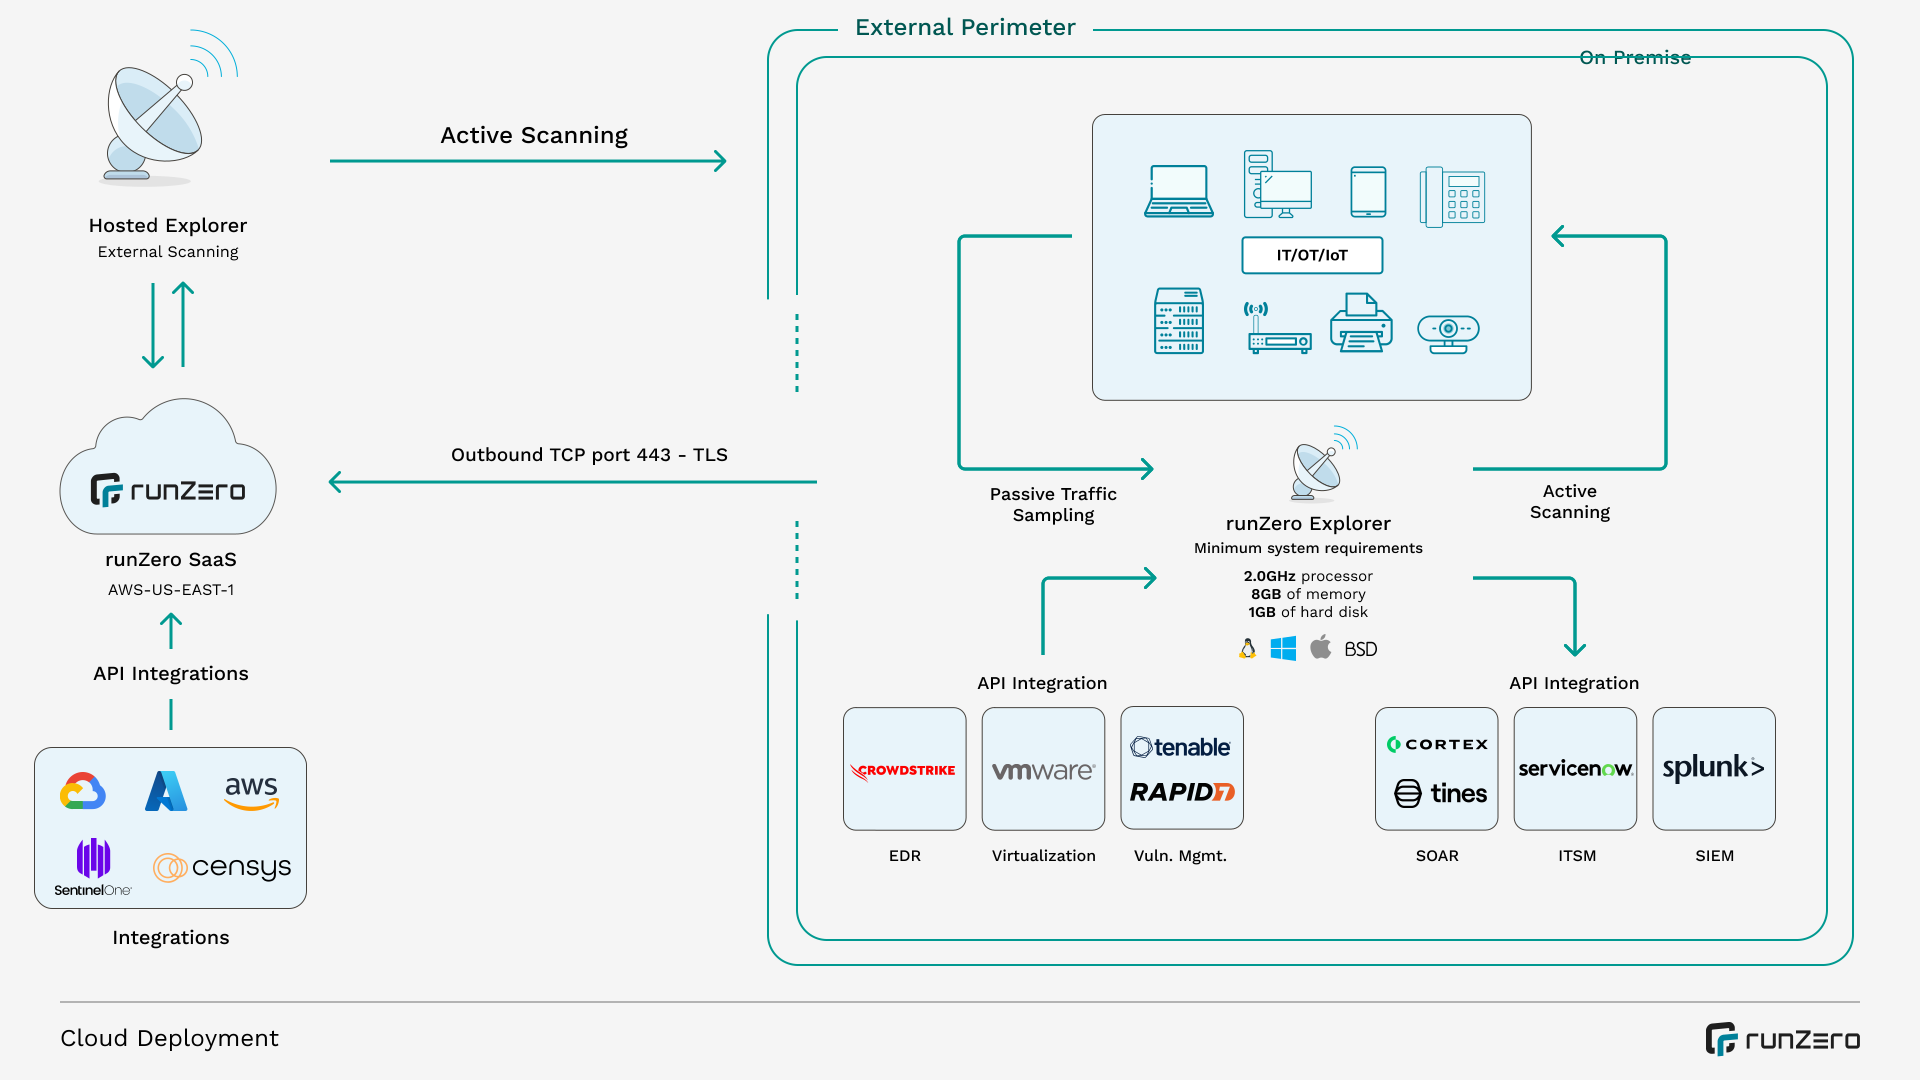
Installation
Sign in to the runZero Console and switch to the Organization the Explorer should belong to. Then select Deploy in the left navigator and choose the Deploy Explorers sub-menu to reach the downloads.
The download link is specific to your active organization, and the wrong link can associate the new Explorer with the wrong organization.
Download the binary for your system from the Explorer download page. For most systems, select the 64-bit (x86_64) architecture. On macOS, pick 64-bit Intel (x86_64) or ARM (Apple M*) to match your hardware. For embedded devices such as the Raspberry Pi 3+, choose the ARM7 architecture. Windows binaries carry a valid Authenticode signature; validate it before launching the executable.
Installation requires administrative privileges. On Windows, a UAC prompt may appear. On Linux and macOS, make the downloaded binary executable (chmod u+x runzero-agent.bin) and run it as root (sudo or a root shell). Either way, the Explorer should install itself as a system service, start immediately, and appear as a new entry on the Explorers page. From there, you can manage it as described in Managing Explorers.
System requirements
Windows
- Operating System
- Windows Server 2016 or newer
- Windows 10 Build 1604 or newer
- Processor running at 2.0 GHz or faster
- At least 16GiB of memory (8GiB for small environments)
- At least 1GB of free storage space
Limitations
-
The Trellix agent for Windows appears to interfere with network scans and traffic capture. Use a system without the Trellix agent for active scans or passive network sampling. Alternatively, switching the Trellix HIDS agent from “block” to “monitor” may allow scans to succeed.
-
EDR, antivirus, and endpoint protection products on Windows may also interfere with Explorer scans, packet capture, or process execution. If scans become unreliable, add allowlist exceptions for runZero and npcap/winpcap components, or use monitor-only policy modes while you validate scans. In some environments, you may need to disable these controls on the host for stable operation.
-
Windows systems with Intel Advanced Matrix Extensions (AMX) enabled may see Explorer instability or crashes, on physical hardware and virtual machines alike. Disable AMX at the BIOS or host level before installing or running the Explorer. For Windows guests on Hyper-V, enabling Processor Compatibility can mitigate this issue.
-
Earlier Windows versions may run the Explorer but are not officially supported.
-
Windows Explorers run a single scan or passive task at a time because of performance limits in the raw packet driver.
Linux
- Kernel version 3.2 or later
- Processor running at 2.0 GHz or faster
- At least 16GiB of memory (8GiB for small environments)
- At least 1GB of free storage space
Linux ARM devices with limited processing power and memory, such as the Raspberry Pi, can run the Explorer but may struggle to scan larger networks or to run integrations with large amounts of data.
macOS
- macOS 11 (Big Sur) or newer
- Processor running at 2.0 GHz or faster
- At least 16GiB of memory (8GiB for small environments)
- At least 1GB of free storage space
You must use the curl download method shown on the deployment page in the Console, because of the Notary requirements introduced in macOS Catalina (10.15).
BSD variants
- Processor running at 2.0 GHz or faster
- At least 16GiB of memory (8GiB for small environments)
- At least 1GB of free storage space
The Explorer requires root access on a recent version of the operating system: FreeBSD 11.2 or newer, or recent versions of NetBSD/DragonFly/OpenBSD.
Configuration
Configure the Explorer with variables in a config.txt file in the same directory as the executable. On Windows, create it at C:\Program Files\runZero\config.txt; on other platforms, use /opt/runzero/bin/config.txt. Besides config.txt, the Explorer also supports the legacy .env name. If /etc/runzero/config is present, it takes precedence.
The file holds one VAR=VAL pair per line.
Configuration file locations
Windows: C:\Program Files\runZero\config.txt
Other platforms: /opt/runzero/bin/config.txt
Web screenshots
The scanner tries any available Chrome, Chromium, or Edge version and reports the browser path and version in the Explorers list in the web console. If it finds no supported browser, install the official Google Chrome package for your operating system to enable web screenshots.
To install the latest Chrome package on Debian-based Linux installations (including Ubuntu):
curl -o chrome.deb https://dl.google.com/linux/direct/google-chrome-stable_current_amd64.deb && \
    sudo apt install ./chrome.deb
To install the latest Chrome package on RedHat-based Linux installations (including Fedora, CentOS, Rocky, and Alma):
curl -o chrome.rpm https://dl.google.com/linux/direct/google-chrome-stable_current_x86_64.rpm && \
    sudo dnf install ./chrome.rpm
These variables change web screenshot behavior when set in the environment or the configuration file:
Set RUNZERO_CHROMIUM_IGNORE_SYSTEM to true to ignore system Chromium paths for screenshots.
Set RUNZERO_CHROMIUM_AUTOMATIC_INSTALL to true to install Chromium automatically when needed. The download comes directly from the Google and Puppeteer CDNs.
Set RUNZERO_CHROMIUM_DEBUG to true for detailed Chromium process logging while screenshots are taken.
Set RUNZERO_CHROMIUM_USER to a valid system username on non-Windows systems. When the scanner runs as root, the Chromium process runs as this user account (and its default GID).
Set RUNZERO_CHROMIUM_CACHE_DIR to the directory for automatic Chromium installations (or installations managed through content updates). It defaults to /opt/runzero/chromium on non-Windows and the binary directory plus \chromium on Windows. The directory holds a LATEST.txt file with a numeric revision, which names a chromium-[revision] sub-directory containing a copy of the Chromium installation.
Set RUNZERO_CHROMIUM_DISABLE_CHROMEDP to true to disable the debug protocol capture mode (now the default).
Set RUNZERO_CHROMIUM_DISABLE_CHROMECL to true to disable the command-line headless --screenshot capture mode (otherwise used as a fallback).
Network communication
The Explorer connects to the runZero Console on TCP port 443 over TLS. This connection carries Explorer registration, job scheduling, status messages, and completed scan jobs. The Console also delivers automatic updates of the Explorer executable. For completely offline environments, the runZero CLI can create scan data files to upload later through the Inventory Import action. The IP addresses involved depend on your deployment model and region. For customers using the SaaS console, these static IPs belong to the runZero consoles.
United States
The console hostname is console.runzero.com.
IPv4
- 13.248.161.247
- 76.223.34.198
IPv6
- 2600:9000:a415:cd87:fbe5:476a:3533:69f2
- 2600:9000:a716:ee91:85f9:3c9:48c9:59b9
Germany
The console hostname is console-eu.runzero.com.
IPv4
- 15.197.131.232
- 3.33.248.90
IPv6
- 2600:9000:a603:e925:542d:6d40:6897:bc3a
- 2600:9000:a70e:635f:71bd:bb0a:8e43:9466
NAT
Run the Explorer on a system with a full bidirectional network connection, not behind a NAT gateway. This includes virtual machines, which should use bridged network adapters.
Juniper DDoS protection is known to break runZero scans.
Proxy support
Some web proxies that perform TLS inspection mishandle Websocket communication, so you’ll need to disable TLS inspection for the runZero Explorer to connect. The most common product with this problem is the Sophos (previously Cyberoam) security appliance. Websense users may need to add a bypass rule for console.runzero.com.
In most cases, the Explorer handles proxies automatically. On Windows, it reads proxy information from the registry keys used by Chrome, Edge, and IE.
You can also set the proxy with the HTTPS_PROXY environment variable. Give HTTPS_PROXY a hostname and port (proxy.example.com:8080) or just a hostname (proxy). The Explorer reads environment variables from your configuration file; the Configuration section shows how to set them. The usual approach is a config.txt file in the same directory as the Explorer binary, with the variables in the format described below.
For a SOCKS proxy, set HTTPS_PROXY to a socks5 URL, for example HTTPS_PROXY=socks5://socks.example.com:1080.
To override the proxy for AWS connections, set HTTPS_PROXY_AWS. It takes priority over any base HTTPS_PROXY setting for the Explorer.
The Explorer tries the configured proxy for each probe and, if that fails, tries a direct connection, so both proxy and non-proxy attempts may appear in logs. Using proxies alone to hide or anonymize Explorer connections is not supported.
TLS configuration
You can set the minimum and maximum TLS versions the Explorer uses for outbound communication to the console, through an environment variable or the configuration file. TLS_VERSION_MIN and TLS_VERSION_MAX accept 1.0, 1.1, 1.2, or 1.3. The default is a minimum of TLS 1.2 and a maximum of TLS 1.3. If the maximum is set lower than the minimum, the maximum is raised to the minimum. runZero does not recommend TLS versions before 1.2.
This example limits the Explorer to TLS version 1.3.
TLS_VERSION_MIN=1.3
TLS_VERSION_MAX=1.3
Restarting an Explorer
The easiest way to restart an Explorer is to force a software update from the cloud console. Otherwise, find the service on the host machine and restart it by hand.
On Linux or Mac, run /opt/runzero/bin/runzero-agent-[uuid] restart, where [uuid] is the ID of the organization the Explorer belongs to.
On Linux, systemd can also restart Explorers. First find the name of the Explorer service (runzero-agent-[uuid]):
systemctl | grep runzero-agent
Then restart the service by that name:
systemctl restart runzero-agent-[uuid]
A kill -9 of the Explorer pid should trigger a restart as well.
On macOS, use launchctl to restart the Explorer:
launchctl kickstart -k runzero-agent-[uuid]
As on Linux, [uuid] is the organization UUID, visible in the runzero-agent-* filename in /opt/runzero/bin.
On Windows, restart the Explorer from the Services console like any other background service.
Removing an Explorer
The easiest way to remove an Explorer is from the Explorers page: find the Explorer, then click the Delete Explorer trash bin icon under the Actions column. This removes the service and terminates the running Explorer process. To remove every online Explorer at once, open the Manage All Explorers menu and choose Uninstall All Online Explorers. To remove an Explorer without the runZero Console, you have a couple of options.
On Windows, each Explorer appears in Programs and Features (as the runZero Agent) and uninstalls like any other application.
On all platforms, including Windows, the Explorer uninstalls itself when run with the uninstall argument from a root or Administrator shell:
Removal on Windows
c:\Program Files\runZero\runzero-agent-[uuid].exe uninstall
Removal on other platforms
/opt/runzero/bin/runzero-agent-[uuid] uninstall
Log management
By default, the Explorer logs to a file and to standard output. On Windows, the log file lives in the installation directory (C:\Program Files\runZero, or C:\Program Files\Rumble for old installations); other platforms log to /var/log/runzero.log and /var/log/runzero.err. The defaults cap log files at 100MiB, create three backups, and expire logs after 90 days. Change them with these values in the $BIN/config.txt file:
RUNZERO_AGENT_LOG_MAX_SIZEsets the maximum log size in mebibytes. The default is 100.RUNZERO_AGENT_LOG_MAX_BACKUPSsets how many backup files log rotation creates. The default is 3.RUNZERO_AGENT_LOG_MAX_AGEsets the maximum age in days for all files, including backups. The default is 90.RUNZERO_AGENT_LOG_COMPRESScontrols whether backups are gzip compressed. The default is false.RUNZERO_AGENT_LOG_STDOUTcontrols whether logs go to standard output. The default is true. On Linux, this sends logs to the system log when systemd or upstart starts the Explorer. On macOS, it produces separate logs under “Log Reports” in the Console application when launchd starts the Explorer.RUNZERO_AGENT_LOG_FILEcontrols whether logs go to the log file described above. The default is true; set it tofalseto stop writing the log file.
Restart the Explorer for these settings to take effect.
Certificate authorities (CAs)
The Explorer validates TLS connections against the system-installed certificate authorities and an internal CA certificate bundle. By default, both the system roots and the bundled roots apply to all secure TLS connections, including Starlark-based custom integrations. Control this with environment variables, set in the $BIN/config.txt file or at the system level:
- Set
RUNZERO_TLS_IGNORE_SYSTEM_ROOTCAto true to ignore the system CA roots. - Set
RUNZERO_TLS_IGNORE_EMBEDDED_ROOTCAto true to ignore the bundled CA roots. - Set
RUNZERO_TLS_ADDITIONAL_ROOTCAto the path of a file with additional CA roots in PEM format.
Manual mode
If the Explorer detects no supported system service manager, such as systemd or upstart, it switches to manual mode: it runs in the foreground and replaces and re-executes its own binary as updates arrive. For temporary installations or container environments, pass the “manual” argument:
$ sudo ./runzero-agent.bin manual
Storage locations
The Explorer installs into %PROGRAMFILES%\runZero on Windows and /opt/runzero/bin on all other platforms, and it writes temporary files to the operating system’s default locations. You can override these locations in the config.txt file (see the Configuration section above); restart or force-update the Explorer service for the change to take effect. Older installations may still use the Rumble versions of these directories and .env instead of config.txt for environment overrides.
On Windows, the temporary file location is the first non-empty value of TMP, TEMP, or USERPROFILE, falling back to the Windows directory. To override it, add an entry like this to config.txt:
TMP=D:\Storage\runZero
On all other platforms, the temporary file location comes from TMPDIR, falling back to /tmp. To override it, add an entry like this to config.txt:
TMPDIR=/home/storage/runzero
Scans that fail to upload are kept in the Explorer installation directory. Import them into the platform manually or with the runZero CLI’s scan --import and scan --upload options.
Container installations
The Explorer can run in standard container environments, with three caveats:
-
Explorer binaries update frequently, and the updates include time-sensitive security coverage. On a read-write container filesystem, the Explorer updates itself but reverts to the older state when the container restarts. We recommend rebuilding the container image frequently, or having the container’s entry point fetch and run the latest binary for your organization on startup. On a read-only container, no updates apply, and each task is delayed by up to five minutes while the Console tries to update anyway.
-
The container must run as root with full privileges to access the raw network device. The exact network parameters differ by container runtime, but this typically means a bridged, macvlan, or host (not host-only) networking option when you deploy the container. Without raw network access, many runZero features stop working, including ARP scans, IPv6 neighbor discovery, TCP SYN scans, and passive network sampling through SPAN ports.
-
The container needs a persistent
RUNZERO_AGENT_HOST_IDenvironment variable, and only one container with that ID should run at a time. Without it, the Explorer re-registers on every container restart, and if several containers share one identifier, they fight over task status and task processing breaks. Set the host ID to a unique 32-character hexadecimal string.
The openssl tool can generate a suitable identifier:
openssl rand -hex 16
01b0283809b24511929d0b062bd36109
A sample Containerfile to edit and use:
#
# Sample Containerfile for running the runZero Explorer in a container, with
# screenshot support.
#
FROM debian:stable

WORKDIR /opt/runzero

# Ensure curl is available and install tools for wireless scanning.
#
RUN apt update && apt install -y curl wireless-tools

# Install Chrome for screenshots.
#
RUN curl -o chrome.deb https://dl.google.com/linux/direct/google-chrome-stable_current_amd64.deb && \
    apt install -y ./chrome.deb

# Set AGENT_URL to be the download URL for your Linux runZero Explorer. To
# find your URL, go to https://console.runzero.com/deploy/download/explorers
# and click on the first URL box to copy it to the clipboard.
#
ENV AGENT_URL=https://console.runzero.com/download/explorer/DT[uniqueToken]/[versionID]/runzero-agent-linux-amd64.bin

# This ID is used to track the Explorer even if the container is rebuilt.
# Set it to a unique 32 character hex ID. You can generate one via:
#
# $ openssl rand -hex 16
#
ENV RUNZERO_AGENT_HOST_ID=[UNIQUE-ID]

# If you need to set environment variables to change the Explorer behavior,
# you can do so via the ENV directive. Example:
#
# ENV RUNZERO_AGENT_LOG_DEBUG=true

ADD ${AGENT_URL} runzero-agent.bin

RUN chmod +x runzero-agent.bin

# For full functionality the runZero CLI needs to send and receive raw
# packets, which requires elevated privileges.
USER root

# The argument `manual` tells runZero not to look for SystemD or upstart.
ENTRYPOINT [ "/opt/runzero/runzero-agent.bin", "manual" ]
This Containerfile works with podman as well as Docker. Because the Explorer needs root privileges, start the container as root. For best results, run it with the --privileged option so the Explorer can listen to network traffic.
Automated installations
The Explorer installs itself automatically when run with root or administrative privileges.
On Linux and BSD, automatic installation depends on a supported init service like systemd or upstart. Without one, the Explorer runs in manual mode instead, overwriting and re-executing itself with each update. To deploy automatically on systems without a supported init service, run the Explorer in the background under the nohup wrapper.
On Windows, the Explorer installs automatically when run interactively or with the updater parameter. Where MSIs are required, the Explorer MSI wrapper deploys an Explorer from the runZero Console or a local mirror.
AWS EC2 installations
The Explorer can run in an AWS EC2 instance, but you’ll need several configuration changes to avoid packet loss when scanning.
-
DNS resolution from EC2 to the AWS DNS server has a fixed cap of 1024 packets per second that cannot be raised. Work around it by setting a custom list of non-AWS nameservers in the advanced section of the scan configuration.
-
Any Security Group without a
0/0rule triggers connection tracking, which has an undocumented limit on connections per instance type. Avoid it by adding0/0 allowfor ICMP/UDP inbound and outbound on the Explorer instance, plus a0/0 allowfor outbound TCP connections. (runZero scans do not currently require inbound TCP. Callback protocols may need it in the future.) -
Overall packet rates have undocumented limits that depend on instance type. Experiment with instance sizing until scans are consistent at a given scan rate. We hope to gather and share data on appropriate instance sizes soon.
The Explorer should work well on a memory optimized, compute optimized, or general compute instance. Because it can make full use of multi-core systems, you may want to match the number of cores to the number of simultaneous scans. You probably won’t want to run larger scans on an instance with less than 32GiB of RAM.